Making your first Command
Before registering your command, you should choose a name. In this example, we define it as a constant array. Using an array allows you to easily add aliases
let names = ["test".to_string()];
// OR with aliases
let names = ["test".to_string(), "testcommand".to_string()];
You should also define a description, which will be displayed when players use the /help command
let description = "My first Command!";Pumpkin's Command API is heavily inspired by Mojang's Brigadier This system allows you to easily manage command syntax and provides automatic tab-completion for players
Implementing the Command Tree
use pumpkin_plugin_api::command::Command;

pub fn init_command_tree() -> Command {
    let names = ["test".to_string(), "testcommand".to_string()];
    let description = "My first Command!";

    Command::new(&names, description)
}
Registration and Permissions
To make the command usable, you must register both the Permission and the Command itself within your plugin context.
First, register the Permission. In this example, we set PermissionDefault::Allow so that everyone can use the command by default
struct MyPlugin;
impl Plugin for MyPlugin {
    fn new() -> Self {
        MyPlugin
    }

    fn metadata(&self) -> PluginMetadata {
        PluginMetadata {
            name: "plugin_docs_plugin".into(),
            version: env!("CARGO_PKG_VERSION").into(),
            authors: vec!["Bjorn".into()],
            description: "A simple example plugin".into(),
        }
    }

    fn on_load(&mut self, context: Context) -> pumpkin_plugin_api::Result<()> {
        tracing::info!("Hello, Pumpkin!");

        context.register_permission(&Permission {
            // This has to have the same name space as provided in your PluginMetadata
            node: "plugin_docs_plugin:test".to_string(),
            description: "Important Test Permission".to_string(),
            default: PermissionDefault::Allow,
            children: Vec::new(),
        })?;

        Ok(())
    }
}
Next, register the command using the permission string created above:
struct MyPlugin;
impl Plugin for MyPlugin {
    // ...

    fn on_load(&mut self, context: Context) -> pumpkin_plugin_api::Result<()> {
        tracing::info!("Hello, Pumpkin!");

        context.register_permission(&Permission {
            // This has to have the same name space as provided in your PluginMetadata
            node: "plugin_docs_plugin:test".to_string(),
            description: "Important Test Permission".to_string(),
            default: PermissionDefault::Allow,
            children: Vec::new(),
        })?;

         context.register_command(init_command_tree(), "plugin_docs_plugin:test");

        Ok(())
    }
}
Rebuild your plugin, move the plugins file into the plugins folder, and restart your server
Congrats!, The command is now registered and should be highlighted in-game and in console
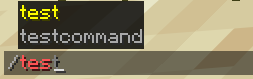
Executing the command right now likely thrown an Syntax error since no Command Executor has been implemented and the Command just does nothing
$ test
$ Invalid Syntax. Usage: /test
Adding an Executor
Lets create a super simple Command Executor without requiring and arguments
struct MyCommandExecutor;

impl CommandHandler for MyCommandExecutor {
    fn handle(
        &self,
        sender: pumpkin_plugin_api::command::CommandSender,
        server: pumpkin_plugin_api::Server,
        args: pumpkin_plugin_api::command::ConsumedArgs,
    ) -> pumpkin_plugin_api::Result<i32, CommandError> {
        Ok(1)
    }
}
Attaching the Executor
Now in order to attach the executor, all that we need to do now is provide it to the Command.
pub fn init_command_tree() -> Command {
    let names = ["test".to_string(), "testcommand".to_string()];
    let description = "My first Command!";

    Command::new(&names, description).execute(MyCommandExecutor)
}
Now you should get no syntax error when running /test.