建立你的第一個指令
在 Pumpkin 中使用 Python 註冊和處理自訂指令的設計簡單直觀且富有表現力。
1. 快速範例
下面是一個完整的最小 Python 插件(main.py),它註冊一個帶有權限檢查的 /hello 指令,並向玩家傳送回應。
python
from pumpkin_api import (
    Plugin, PluginMetadata, register_plugin,
    permission, command, context, server
)

class HelloCommand:
    def handle(self, sender: command.CommandSender, srv: server.Server, args: command.ConsumedArgs) -> int:
        sender.send_message("Hello from Python Plugin!")
        return 1

class MyPlugin(Plugin):
    def metadata(self) -> PluginMetadata:
        return PluginMetadata(
            name="my_python_plugin",
            version="0.1.0",
            authors=["Developer"],
            description="My first Pumpkin Python plugin"
        )

    def on_load(self, ctx: context.Context) -> None:
        # 1. 註冊權限節點
        ctx.register_permission(permission.Permission(
            node="my_python_plugin:hello",
            description="Allows executing the /hello command",
            default=permission.PermissionDefault.ALLOW,
            children=[]
        ))

        # 2. 建構帶有別名和執行器的指令樹
        cmd = command.Command(["hello", "hi"], "Greets the player")
        cmd.execute(HelloCommand())

        # 3. 註冊指令
        ctx.register_command(cmd, "my_python_plugin:hello")

register_plugin(MyPlugin)
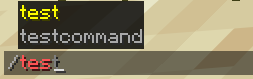
2. 遊戲內預覽
註冊後,你的指令會自動在 Minecraft 中獲得用戶端自動自動完成、語法驗證和顏色高亮功能:
3. 工作原理
分步解析
第 1 步:定義權限
Pumpkin 中的指令需要權限節點。使用 permission.PermissionDefault.ALLOW 註冊該節點,可預設允許執行指令:
python
ctx.register_permission(permission.Permission(
    node="my_python_plugin:hello",
    description="Allows executing the /hello command",
    default=permission.PermissionDefault.ALLOW,
    children=[]
))
第 2 步:建構指令樹
建立一個帶有主名稱和別名的 command.Command 實例,然後透過 .execute(...) 附加處理器:
python
cmd = command.Command(["hello", "hi"], "Greets the player")
cmd.execute(HelloCommand())
第 3 步:透過 Context 註冊
將指令樹和權限節點字串傳遞給 ctx.register_command:
python
ctx.register_command(cmd, "my_python_plugin:hello")