Creating Your First Command
Registering custom commands in Pumpkin using C# provides a strongly-typed, clean structure.
1. Quick Example
Here is a complete C# plugin file (MyPlugin.cs) that registers a /hello command with permission checks and sends a response back to the player.
csharp
using PluginWorld;
using PluginWorld.wit.Exports.pumpkin.plugin.v0_1_0;
using PluginWorld.wit.Imports.pumpkin.plugin.v0_1_0;

namespace MyPumpkinPlugin;

public class MyPlugin : IPluginWorldExports, IMetadataExports
{
    public static void InitPlugin() { }

    public static void OnLoad(IContextImports.Context context)
    {
        // 1. Register permission node
        var perm = new IPermissionImports.Permission(
            "my_csharp_plugin:hello",
            "Allows executing the /hello command",
            IPermissionImports.PermissionDefault.Allow,
            []
        );
        IContextImports.RegisterPermission(context, perm);

        // 2. Build and register command tree
        var command = ICommandImports.Command.New(["hello", "hi"], "Greets the player");
        IContextImports.RegisterCommand(context, command, "my_csharp_plugin:hello");
    }

    public static void OnUnload(IContextImports.Context context) { }

    public static IEventImports.Event HandleEvent(uint eventId, IServerImports.Server server, IEventImports.Event @event)
    {
        return @event;
    }

    public static int HandleCommand(uint commandId, ICommandImports.CommandSender sender, IServerImports.Server server, ICommandImports.ConsumedArgs args)
    {
        ICommandImports.SendMessage(sender, "Hello from C# Plugin!");
        return 1;
    }

    public static void HandleTask(uint handlerId, IServerImports.Server server) { }

    public static IMetadataExports.PluginMetadata Metadata()
    {
        return new IMetadataExports.PluginMetadata(
            "my_csharp_plugin",
            "0.1.0",
            "My first Pumpkin C# plugin",
            ["Developer"],
            []
        );
    }
}
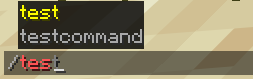
2. In-Game Preview
Once registered, your command automatically gains client-side autocompletion, syntax validation, and color highlighting in Minecraft:
3. How It Works
Step-by-Step Breakdown
Step 1: Define the Permission Node
Construct an IPermissionImports.Permission record and register it via IContextImports.RegisterPermission:
csharp
var perm = new IPermissionImports.Permission(
    "my_csharp_plugin:hello",
    "Allows executing the /hello command",
    IPermissionImports.PermissionDefault.Allow,
    []
);
IContextImports.RegisterPermission(context, perm);
Step 2: Build the Command Tree
Instantiate your command with primary names and description:
csharp
var command = ICommandImports.Command.New(["hello", "hi"], "Greets the player");Step 3: Register and Handle
Register the command with IContextImports.RegisterCommand and process incoming executions inside HandleCommand:
csharp
IContextImports.RegisterCommand(context, command, "my_csharp_plugin:hello");Next Steps
- Follow the C# Quick Start Guide to configure
.csprojand build WebAssembly outputs.