Creating Your First Command
Registering and handling custom commands in Pumpkin using TypeScript provides a strongly-typed and clean structure.
1. Quick Example
Here is a complete TypeScript plugin file (src/index.ts) that registers a /hello command with permission checks and sends a response back to the player.
typescript
import { Plugin, registerPlugin } from "@pumpkinmc/pumpkin-api-ts";
import { PluginMetadata } from "pumpkin:plugin/metadata@0.1.0";
import { Context } from "pumpkin:plugin/context@0.1.0";
import { Command } from "pumpkin:plugin/command@0.1.0";
import { Permission } from "pumpkin:plugin/permission@0.1.0";
import { TextComponent } from "pumpkin:plugin/text@0.1.0";

class HelloPlugin extends Plugin {
  metadata(): PluginMetadata {
    return {
      name: "my_ts_plugin",
      version: "0.1.0",
      authors: ["Developer"],
      description: "My first Pumpkin TypeScript plugin",
      dependencies: [],
      permissions: [],
    };
  }

  onLoad(ctx: Context): void {
    super.onLoad(ctx);

    // 1. Register permission node
    const permission: Permission = {
      node: "my_ts_plugin:hello",
      description: "Allows executing the /hello command",
      default: { tag: "allow" },
      children: [],
    };
    ctx.registerPermission(permission);

    // 2. Build the command tree with aliases
    const cmd = new Command(["hello", "hi"], "Greets the player");

    // 3. Register the command with handler and permission
    this.registerCommand(
      ctx,
      cmd,
      (sender, _server, _args) => {
        sender.sendMessage(TextComponent.text("Hello from TypeScript Plugin!"));
        return 1;
      },
      "my_ts_plugin:hello",
    );
  }
}

registerPlugin(new HelloPlugin());

export * from "@pumpkinmc/pumpkin-api-ts";
2. In-Game Preview
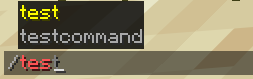
Once registered, your command automatically gains client-side autocompletion, syntax validation, and color highlighting in Minecraft:
3. How It Works
Step-by-Step Breakdown
Step 1: Define the Permission Node
Commands in Pumpkin require a permission node. Register it with default: { tag: "allow" } to allow execution by default for all players:
typescript
const permission: Permission = {
  node: "my_ts_plugin:hello",
  description: "Allows executing the /hello command",
  default: { tag: "allow" },
  children: [],
};
ctx.registerPermission(permission);
Step 2: Build the Command Tree
Instantiate a Command with the primary name, aliases, and description:
typescript
const cmd = new Command(["hello", "hi"], "Greets the player");Step 3: Register Command & Handle Execution
Pass the command tree and permission node to this.registerCommand(...), returning 1 for successful execution:
typescript
this.registerCommand(
  ctx,
  cmd,
  (sender, server, args) => {
    sender.sendMessage(TextComponent.text("Hello from TypeScript Plugin!"));
    return 1;
  },
  "my_ts_plugin:hello",
);
Next Steps
- Check out Events to handle player actions and server events in TypeScript.
- Learn more about Basic Logic.