Creating Your First Command
Registering custom commands in Pumpkin using Kotlin is concise, idiomatic, and strongly typed.
1. Quick Example
Here is a complete Kotlin plugin (Plugin.kt) that registers a /hello command with permission checks and sends a response back to the player.
kotlin
package plugin

import pumpkin.plugin.context.Context
import pumpkin.plugin.command.Command
import pumpkin.plugin.permission.Permission
import pumpkin.plugin.permission.PermissionDefault

class MyPlugin {
    fun onLoad(ctx: Context) {
        // 1. Register permission node
        ctx.registerPermission(
            Permission(
                node = "my_kotlin_plugin:hello",
                description = "Allows executing the /hello command",
                default = PermissionDefault.ALLOW,
                children = emptyList()
            )
        )

        // 2. Build and register command tree
        val cmd = Command(
            names = listOf("hello", "hi"),
            description = "Greets the player"
        )
        ctx.registerCommand(cmd, "my_kotlin_plugin:hello")
    }

    fun handleCommand(sender: pumpkin.plugin.command.CommandSender): Int {
        sender.sendMessage("Hello from Kotlin Plugin!")
        return 1
    }
}
2. In-Game Preview
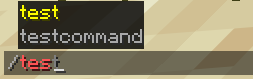
Once registered, your command automatically gains client-side autocompletion, syntax validation, and color highlighting in Minecraft:
3. How It Works
Step-by-Step Breakdown
Step 1: Define the Permission Node
Construct a Permission object and pass it to ctx.registerPermission:
kotlin
ctx.registerPermission(
    Permission(
        node = "my_kotlin_plugin:hello",
        description = "Allows executing the /hello command",
        default = PermissionDefault.ALLOW,
        children = emptyList()
    )
)
Step 2: Build the Command Tree
Instantiate Command with primary names and aliases:
kotlin
val cmd = Command(
    names = listOf("hello", "hi"),
    description = "Greets the player"
)
Step 3: Register with Context
Register the command with ctx.registerCommand and handle calls inside handleCommand:
kotlin
ctx.registerCommand(cmd, "my_kotlin_plugin:hello")Next Steps
- Follow the Kotlin Quick Start Guide to configure your
Makefileand Kotlin/Wasm build tools.